Every app needs a database. Databases store and manage the information apps rely on for everything they do, from user logins to core app functionality. The most common type of database used in app development is the relational database, also known as an SQL database.
Designing a relational database may sound overwhelming at first, especially if you’ve never worked with one before, but it’s simpler than it seems. You just need to understand how relational databases work, what data your app will need, and how to structure data so it’s easy to retrieve it when you need it.
In this article, we’ll walk you through everything you need to know to design a relational database. The general principles we’ll use will apply to any relational database, and for the specifics, we’ll be taking you step by step through creating a relational database in Bubble — our full-stack no-code app development platform.
How relational databases work
If you’ve ever used spreadsheet software like Excel or Google Sheets, then you already understand the basic idea of structuring data in an organized manner for easy retrieval.
Spreadsheets accomplish this with rows and columns. You might, for example, have a spreadsheet of contact information, where each row represents a different person, and each column represents a different piece of information for that person, such as name, email, and phone number.
| Name | Phone number | |
|---|---|---|
|
Robert Brown |
(555) 567-8901 |
|
|
Max Davis |
(555) 123-4567 |
|
|
Ethan Kim |
(555) 456-7890 |
|
|
Aisha Patel |
(555) 234-5678 |
In spreadsheets, these are one-to-one relationships, meaning that every person is assigned a single name, a single email, and a single phone number. But what if you need to assign multiple values for a single person, such as a secondary email? You’ll either have to add extra columns with additional values that not every person will have, or you’ll have to add duplicate entries for a single person, but with different contact information. Neither of these solutions is ideal.
Unlike spreadsheets, relational databases handle this using one-to-many, many-to-one, or many-to-many relationships. In other words, a single person could have as many emails as they need, multiple people could share the same phone number, and a group of people could have residence across several different addresses.
Rather than storing all information in a single spreadsheet, relational databases organize data into multiple tables, each representing a specific data type. These tables consist of fields (or columns), where each field holds a single piece of information. For complex relationships, a field can reference another table instead of containing raw data. For example, you might have a table for people and another table for email addresses. In the people table, the field for Email could link to the email addresses table, allowing a single person to be associated with multiple email addresses
In this manner, relational databases make it possible to store all the information needed for your app, with all relationships appropriately linked together, no matter how complex those relationships may be.
How to design a relational database
We all know how to start with a spreadsheet. But this might be the first time you’ve had to design a relational database. Not to worry — Bubble’s database structure makes it easy. For the purposes of demonstration, we’ll use the example of an event planner app, and we’ll walk you through designing the database for that app in Bubble. Here’s how to do it.
Step 1: Outline your database structure
Before you actually start creating a database, think about your app’s needs, and outline all the pieces of information you expect to store within the database. While you can always add more to your database later, this initial work ensures you don’t miss anything important in your MVP, and that you’re able to properly connect all the relationships within the data.
To do this, you’ll want to put yourself in the place of a user for your app, walk through any actions they might take, and consider each piece of data the app will need to accomplish each step along the way. Try to organize these elements into the top-level data types and the individual fields which relate to a data type. Let’s do that for our event planner app.
The first thing a user will do is log into the app, so you’ll need to store all the basic information associated with user accounts — username, email, password, etc. On Bubble, you’ll notice the user type comes with your app and has built-in fields like email. This streamlines development so the only fields you need to add to your user type are the additional ones you want your app to store.
Once logged in, a user should have the ability to create, view, and manage events, so you also know you’ll need to store data for events, including title, location, start time, end time, and description. Each event should also assign the user as the organizer, and users should be able to send invitations to attendees. You’ll need a way to store which invitations have been sent to which users, as well as the status of those invitations (pending, accepted, or rejected).
You can outline this on paper or in any document or note-taking app. For our event planner example, you might end up with an outline that looks like this:
- User
- Full name
- Password (hidden in Bubble editor but it's there automatically!)
- Event
- Title
- Location
- Start time
- End time
- Description
- Organizer
- People Attending
- Invitation
- Event
- Attendee
Step 2: Create data types
Once you’ve outlined the information your database will store, you can start creating data types (or tables) accordingly.
On Bubble, this will be done from the data tab. Under Data types you’ll see the default User data type already there. Let’s add a field on the user so we can store the user’s full name.
For our example app, we’ll add Event, then click Create.
For your relational database, create new data types for each of the top-level pieces of data you identified in the previous step.
Step 3: Create fields
After adding all the data types, we can go through and add their fields.
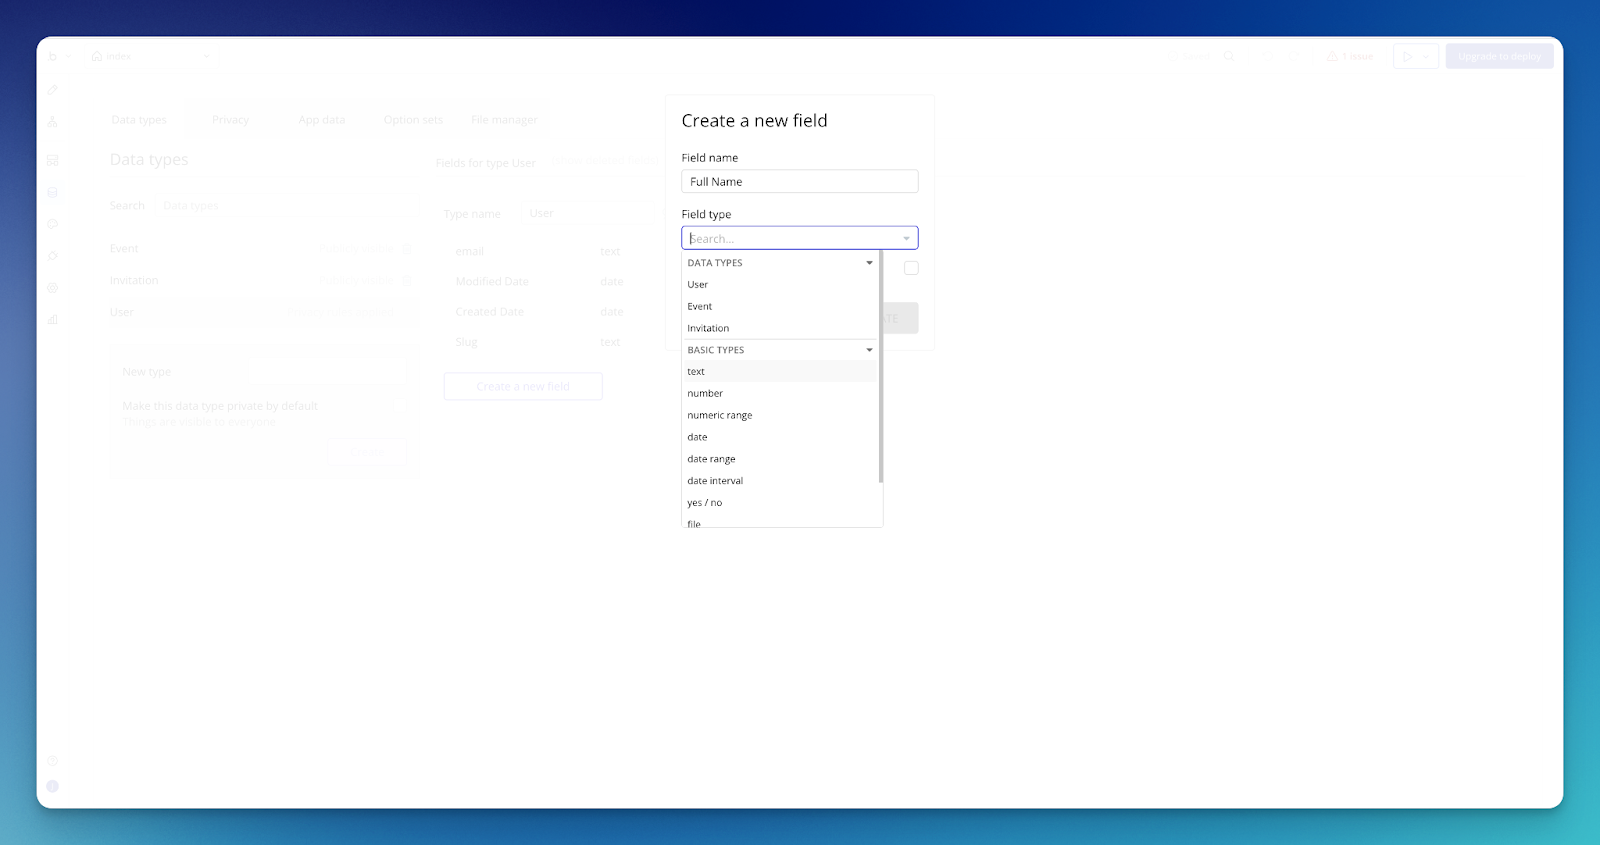
Start by going to the User data type that was created by default, then click Create a new field. For the Field name, type in Full name. Then for Field type, you’ll see a drop-down list with a selection of different options, depending on the type of data being stored. In this case, it’s a simple text field. Because each user will only have a single user name, you don’t need to check the list option. Click Create, and you’ll see the Full name field added.
You’ll also see a built-in field for email, so you don’t need to create that. And as for the password, Bubble handles that separately as encrypted data, so you won’t need to add it either.
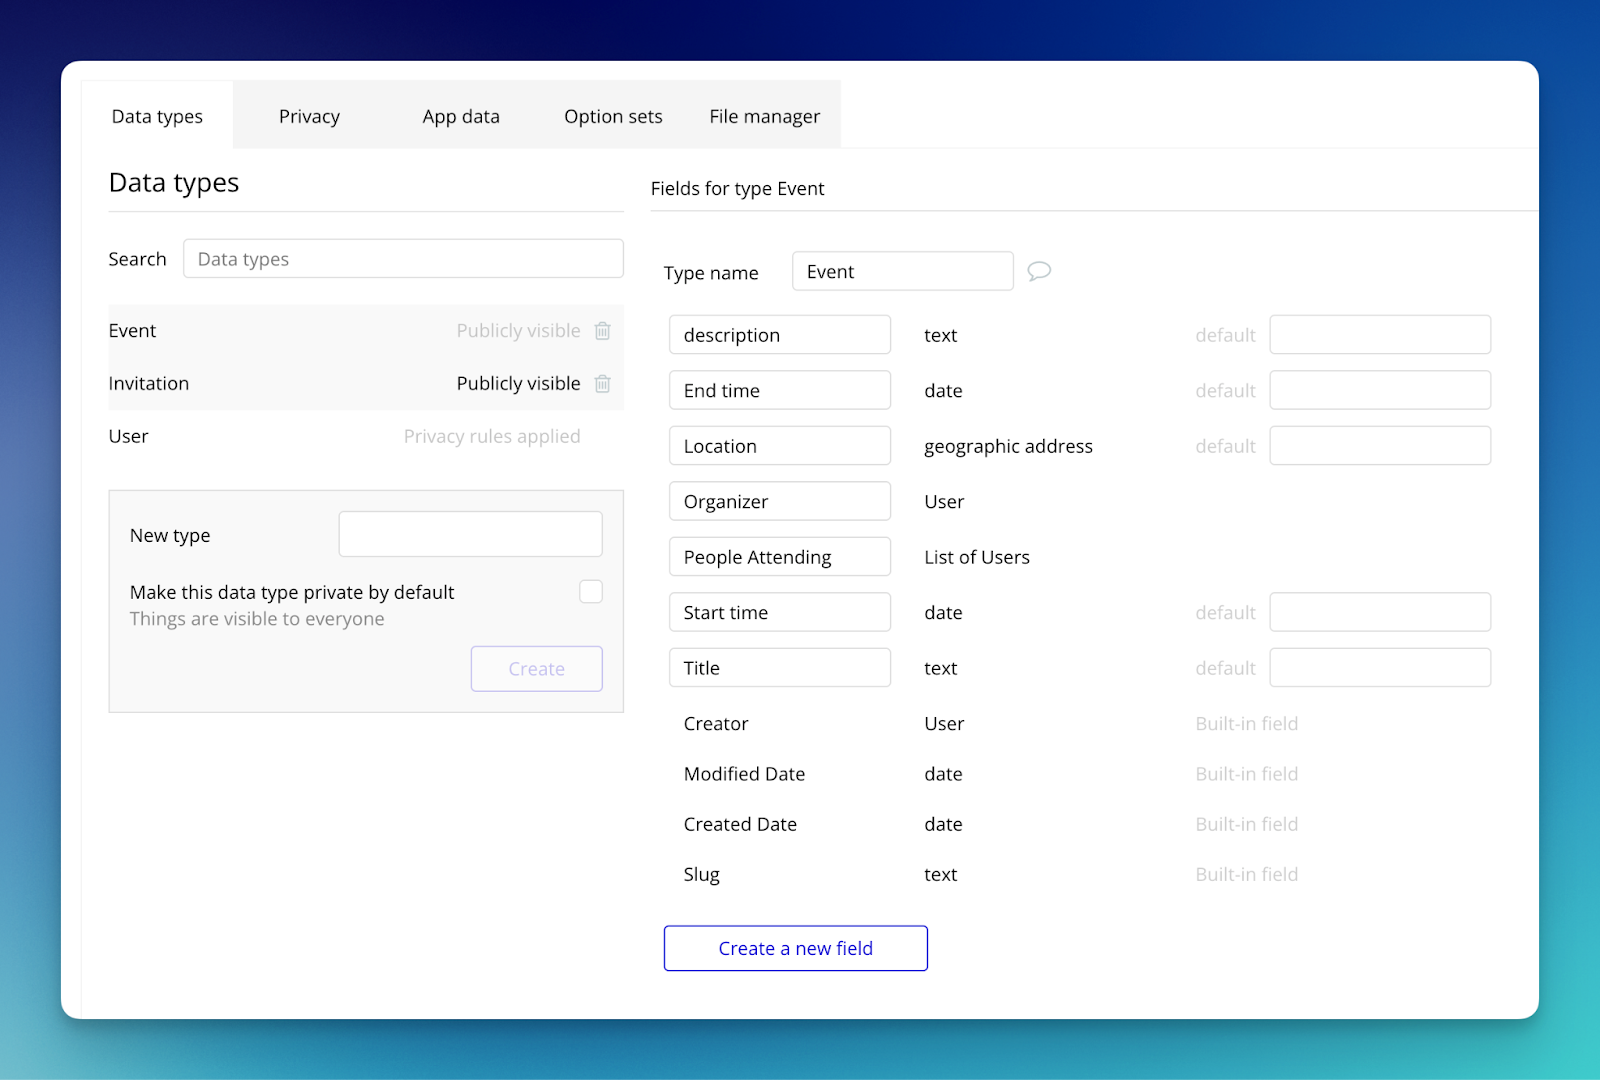
Now we can move on to the Event data type. Here’s a breakdown of the fields and field types to create:
- Title (text)
- Location (geographic address)
- Start time (date)
- End time (date)
- Description (text)
- Organizer (User)
- Attending (User — make sure to check List since a single event can have multiple attendees)
A quick note: For Organizer and People Attending, these are instances where you’ll be selecting another data type as a field for this data type. In this case, User.

Finally, for the Invitation data type, create a new field called Event, and select the Event data type from the list. This will ensure that each invitation is relationally connected to the appropriate event. You’ll also add an Attendee field, selecting the User data type.
Following this same process, you can go through the data types identified for your database and add all the fields to each, linking different data types together wherever needed. And that’s it — you’ve designed and created a relational database!
Build your database (and your whole app) on Bubble
Bubble’s no-code app development platform empowers anyone to bring their app idea to life — even if you have zero programming experience.
If you’ve followed along with this tutorial, then you’ve already seen how straightforward it is to create a database on Bubble. Now all that’s left to finish your app is designing a user interface with our drag-and-drop visual editor (or having our AI design instantly generate a user interface from a text prompt) and then structuring the backend logic using if/then statements. No coding required!
Build for as long as you want on the Free plan. Only upgrade when you're ready to launch.
Join Bubble