TL;DR: Build an Uber-style ride-sharing app on Bubble by configuring three data types (User, Trip, and Rating), building workflows for booking, driver matching, and Stripe payments, and using repeating groups to display trips — all without writing code.
Building a ride-sharing app is more complex than it looks. Location tracking, dual user roles, payment processing, trip logic, and ratings: the feature set adds up fast. Custom development is expensive, most tutorials assume a coding background, and there's always the risk of ending up with a prototype that can't scale.
That's the problem this guide is built around. On Bubble, you build visually, with no code to write and no black box to decipher. You can see exactly how your app works, fix things yourself when something isn't right, and ship to real users on production-grade infrastructure.
This is a step-by-step guide to building a ride-sharing MVP on Bubble. You'll configure a database for users, trips, and ratings, build a booking flow with map integration and distance-based pricing, process payments through Stripe, create a driver portal, and add a rating system for completed trips.
What is an Uber clone?
An Uber clone is a custom-built ride-sharing app that works like a two-sided marketplace: Riders request trips, drivers accept them, and payments process automatically. The core feature set typically includes location and mapping, driver matching, pricing logic, and in-app payments. Building your own version lets you enter a specific local market without the cost of custom development, though you'll still need to plan for third-party services, compliance requirements, and anything specific to your region.
Core features your Uber clone needs
Before you dive in, define the scope of your app. A successful ride-sharing app requires specific features to function for both riders and drivers.
- User authentication and profiles: Riders and drivers need separate account types to manage their personal information, payment methods, and ride history.
- Location and mapping: The app must capture the rider's pickup location and destination, calculate the distance, and display the route on a map.
- Pricing and payments: You need an algorithm to calculate trip costs based on distance or time, plus a secure payment gateway to process credit cards.
- Driver matching and trip management: Drivers need a dedicated portal to view available ride requests, accept trips, and mark them as complete.
- Rating system: This tutorial covers a rider-to-driver rating flow that builds trust by letting riders review their experience after a trip. To make it two-way, add a separate driver-to-rider flow with matching database fields.
Get started
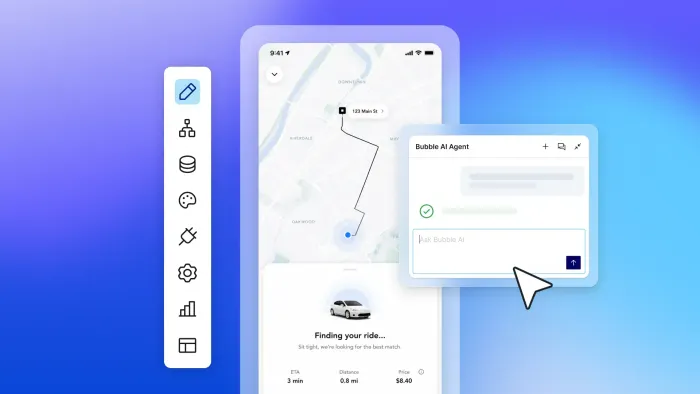
To get started, create a Bubble account. You can build manually in the visual editor or use Bubble AI to generate a working foundation for your app, then follow along to refine the database, workflows, and interface.
Register your account on Bubble
Bubble Academy's introductory lessons guide you through the most common Bubble features step by step. The Bubble AI Agent (beta) can also provide contextual help while you build, giving you a running start on your ride-sharing app.
When kickstarting your project, you can begin by wireframing your product design or by building the necessary fields within your database.
In this case, you'll start by using Bubble's visual design tool to shape the user interface. If you're replicating a version of Uber, some of the core pages to include are:
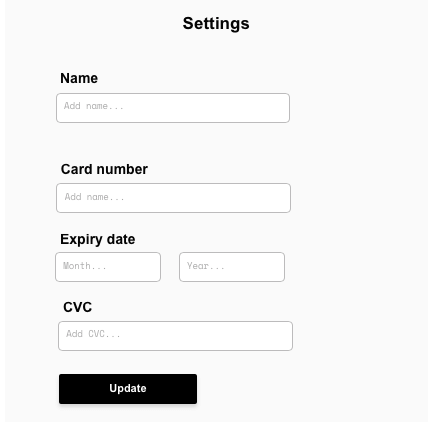
- Account settings page: Where users can update their account information
- Home page: Used to select the pickup and destination address of a trip
- Driver portal: A page where drivers can view all available trips
- Trip summary page: Displaying a summary of each trip once it has been accepted
- User account: Showcasing a list of all a user's previously booked trips
- Rating page: Where users can leave ratings for a driver
A major feature within Bubble is the ability to send data between pages. This lets you create one generic version of a page, then dynamically display the relevant content from your database when it's required.
For your ride-sharing app, you only need to create one page to host each trip summary. You can then build the necessary workflows to display only the relevant items on each page when they're needed.
Or start from a template
If you'd prefer not to build from scratch, Rapid Dev offers two tiers of a ride-sharing template in the Bubble Marketplace:
- Uber - like Taxi & Ridesharing — the full version, with mobile design, Stripe payments, and Google Maps integration
- Uber - like Taxi & Rideshare Lite — a lighter version with core functionality and a simpler feature set
Starting from a template will get you further faster, but you'll still want to understand the database structure, workflows, and payment logic covered below so you can customize the app to fit your market.
Configuring your database
Once you've mapped out the display of your product, you can focus on creating the data fields to power your application. These fields connect the workflows behind your product.
Bubble's visual database designer lets you create data types and relationships without SQL, and the AI Agent can help generate data structures while privacy rules help secure sensitive data. When building a ride-sharing MVP, you'll need three data types:
| Data type | Fields |
|---|---|
| User | Name, Driver (yes/no), Previous trips (list of trips), Stripe Customer ID |
| Trip | Rider, Rating, Price, Pickup location, Destination location, Driver (user), In-progress (yes/no), Complete (yes/no) |
| Rating | Trip, Star rating, Driver (user), Content |
Note: Never store raw card numbers or CVCs in your database. Bubble's Stripe plugin redirects users to Stripe's hosted Checkout page, so sensitive card data never touches your app. Save the Stripe Customer ID returned after a successful charge to avoid requiring repeat card entry for returning users.
Also: Creating a list field that references another data type (like “Previous trips” on the User data type) stores links to those related things, letting you access their fields dynamically without duplicating those fields on the User type.
Building workflows
In Bubble, workflows are how your app does things. Each workflow triggers when an event occurs (like a user clicking a button) and then runs a series of actions in response, such as signing the user up or making a change to the database.
Updating user account details
The first feature to build is a page that lets users edit their account details (name and payment information) which the app needs to book and pay for rides. On the account settings page, add a text input element for each editable data field in a user’s account.
Planning a trip
Once user accounts exist, you can start building the core features of your product. Begin with a booking function — letting users input their desired pickup and destination address, then generating a trip based on that data.
On the home page, start by adding a map element and two input fields. Configure both text input fields to an address content format.
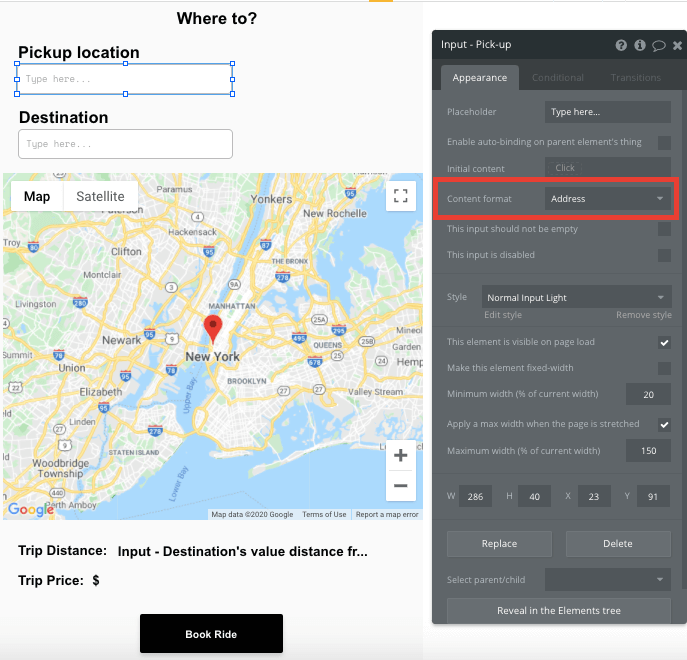
Set the inputs to geographic address format so they work with Bubble’s Google Maps-powered map element. For production or custom domains, configure the required Google Maps, Geocoding, and Places API keys in your settings, along with any required Google Cloud billing.
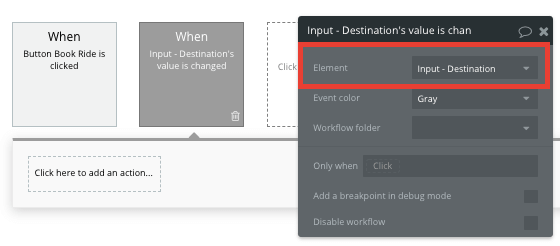
Next, configure the map to display each of these locations as they’re added. Start by setting the map’s marker address to be the pickup input’s address.
Next, display the destination marker once that address has been added.
In your workflow editor, create a new event when an item’s value is changed.
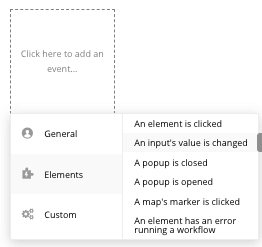
Configure this to the destination input field.
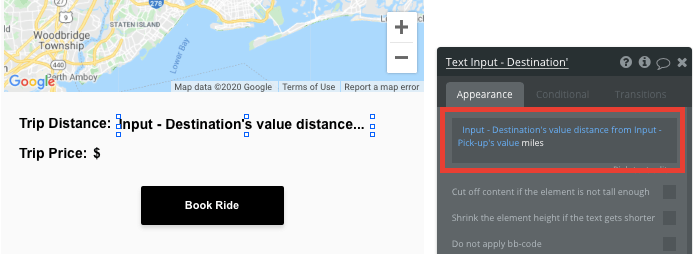
Once the user has added both addresses, you can produce a trip forecast detailing the total distance and price.
Below the map, add a dynamic text field that displays the distance between both address inputs.
Generating prices
Once the distance between both locations has been classified, you can build a pricing rule for the trip.
Using a text input field, you can add conditions to set price variations. Conditions make it possible to display unique elements when requirements are met throughout your app.
The conditions for this element identify the length between two addresses (measured in miles per your map), then trigger a certain price if it fits between a unique threshold.
For example: If the distance between the destination and pickup addresses is greater than 1, and the distance is less than 5, the condition displays the text $15.
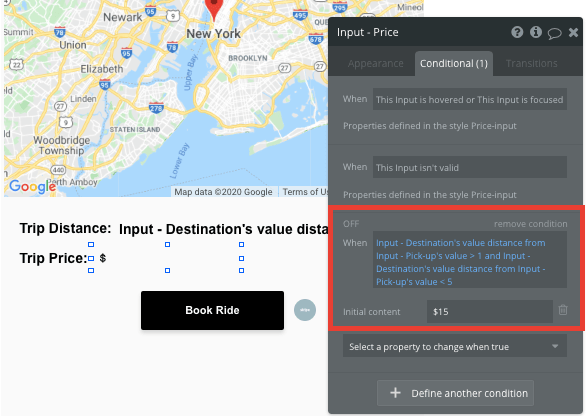
Continue adding conditions to meet the different price thresholds you’d like to charge.
For an MVP, a distance-threshold rule like this is enough. A production-grade dynamic pricing model would also account for time, demand, driver availability, ride type, tolls, and other fees.
By updating the style of an input field, you can remove the default background and border of the element.
Finally, disable this input field so users can’t edit the trip’s price.
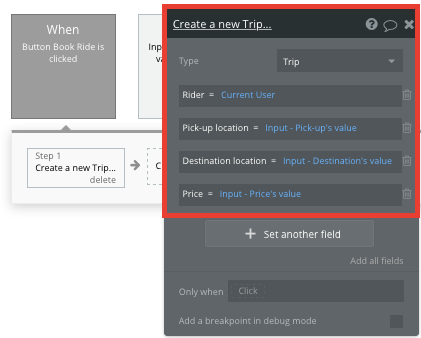
Generating a new ride
Once a user is ready to book a ride, create a new workflow that triggers when the book ride button is clicked.
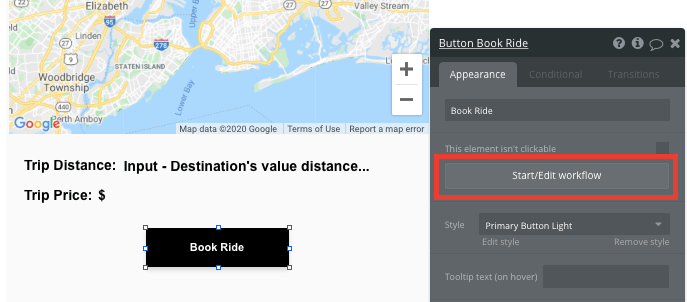
Within this workflow, create a new thing.
The thing to create is a new trip. Match the relevant elements on your page to the data fields from the trip type in your database.
Processing payments
After generating a new trip in your database, charge the user. Bubble’s official Stripe plugin is the simplest way to handle this. Install it from the Bubble Marketplace and add your Stripe publishable and secret keys in the plugin settings. Use your test keys during development and switch to live keys before launching.
Note: Never collect or store raw card numbers in your Bubble database. Stripe’s hosted Checkout page handles all sensitive card data on Stripe’s servers, keeping your app outside PCI scope.
When processing a payment, add a “Charge the current user” action to the workflow that runs when the book ride button is clicked. This action redirects the user to Stripe’s hosted Checkout page, where they enter their card details. Set the amount dynamically from the price field on the page, and set the currency and product description to match your app.
Once the payment is complete, Stripe redirects the user back to your app. Bubble resumes the workflow from where it left off, so you can use the result of the charge step (including the Stripe charge ID and a confirmation of success) to update your database and proceed with the booking. Save the Stripe Customer ID to the user’s record so returning riders don’t need to re-enter their card details.
For additional guidance when building your payment workflow, watch a full tutorial here.
Building a portal for drivers
Once a new trip has been created, display this information to drivers on the driver portal page.
On this page, add a repeating group element to display a list of all available trips created by users.
Repeating groups integrate with your database, displaying and updating with dynamic content.
When using a repeating group, first configure its data type and source. Set the data type to trips, and the data source to search for all trips in your database.
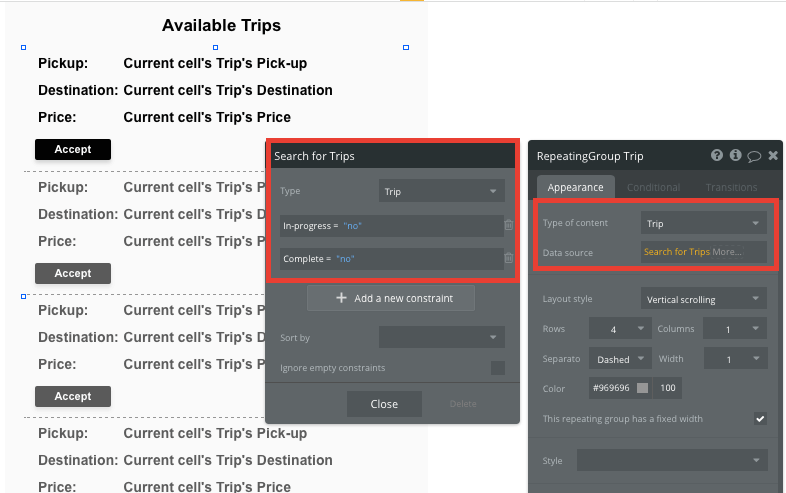
Add two constraints, filtering for only the trips with in-progress and complete status set to “no.” This ensures that only currently active trips display in this grid.
Now you’re ready to structure the dynamic content that will display within this grid. Map out the first column with the relevant content, then this element will populate the remaining columns based on your existing data.
When a driver is ready to accept a ride, they can click the accept button, triggering a new workflow to update the status of the ride.
Within this workflow, make changes to a thing.
The thing to change is the current cell’s trip: Update its in-progress status to “yes,” then add the current user as the dedicated driver.
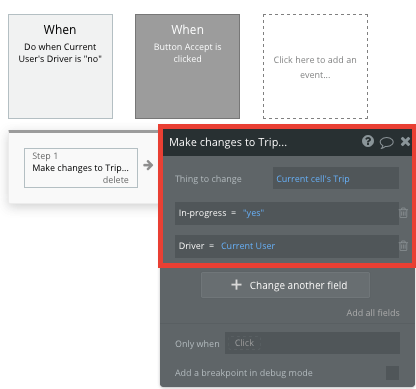
Note: Changing the in-progress status will remove this trip from the repeating group.
Next, send the driver to the trip summary page, displaying an overview of this specific trip.
Start by adding another step to your current workflow, opting to go to another page.
When sending the user to the trip summary page, also send the data from the current cell’s trip.
Marking a trip as complete
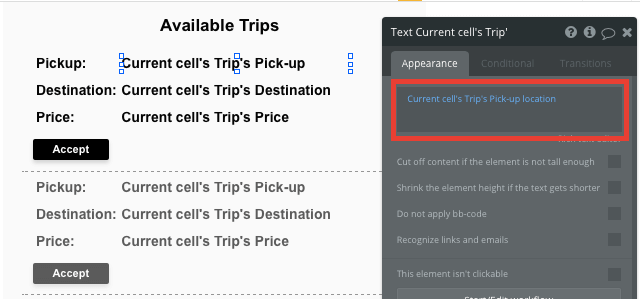
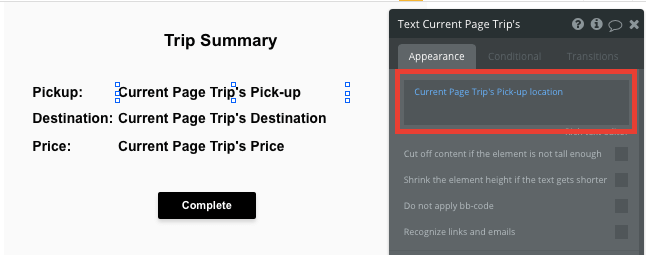
On the trip summary page, display the information from the trip the driver has just accepted.
To begin, configure the page type to be a trip.
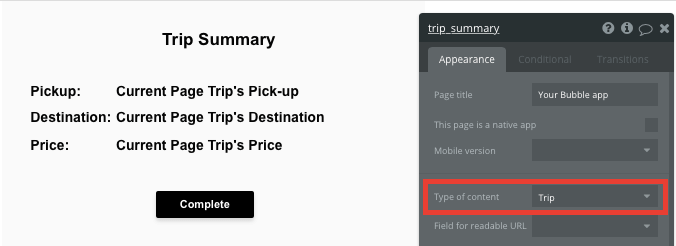
Map out the page content using dynamic elements that display the current trip’s information.
Once a ride has finished, the driver clicks the complete button to update the trip status.
Create another workflow that makes changes to the current page’s trip, this time updating the complete status to “yes.”
Creating a summary of user trips
After a ride is completed, add a summary of the trip to the user’s account and give them the option to rate their overall experience.
On the user account page, add another repeating group. Configure this as a trip data type, with the data source set to display only the trips where the rider was the current user and the complete status is “yes.”
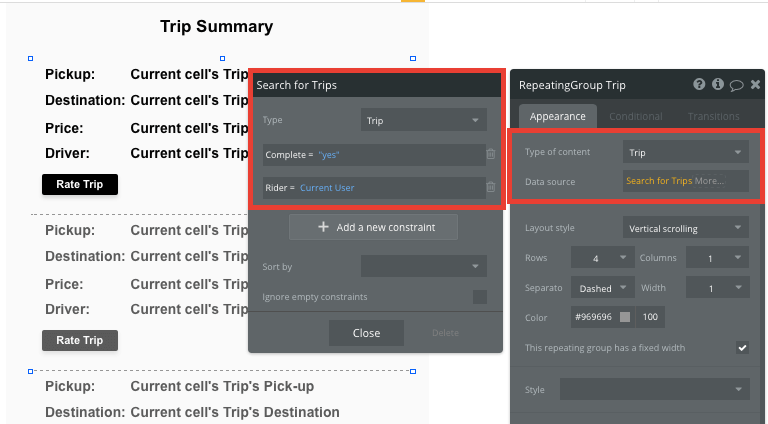
These additional configurations ensure the user sees only the trips relevant to their account.
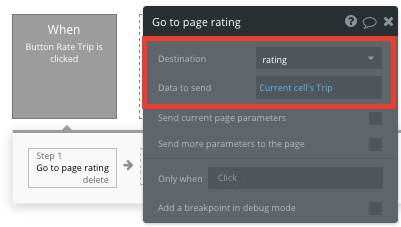
If the user would like to rate their driver, they can click the rate trip button, triggering another navigational event.
In this workflow, send the user to the rating page, passing with it the data from the current cell’s trip.
Rating a trip
On a dedicated rating page, a user can leave a review for a previous trip.
Configure this page as a trip type.
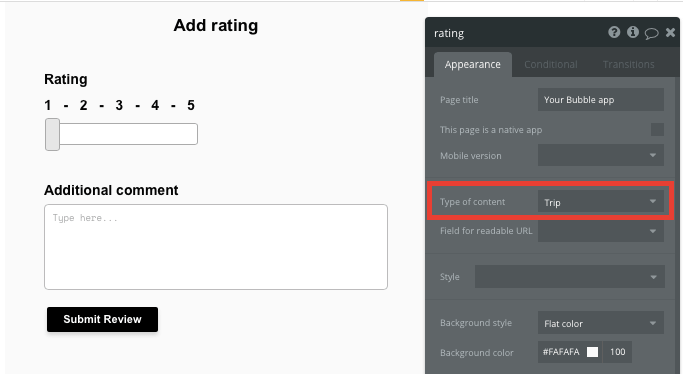
On this page, use a slider element and a multiline input field, letting users add the content for their rating.
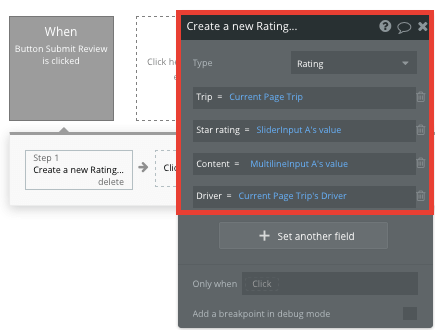
When the submit review button is clicked, build a new workflow that creates a new thing. The thing to create is a new review.
Map the on-page elements to the necessary data fields under each review.
Additional features
Once you’re familiar with creating custom data fields and displaying dynamic content, you can start getting creative with the experiences you build in your ride-sharing app.
Additionally, you can:
- Create profiles for drivers and display a list of their trip reviews: Build a dedicated driver profile page that aggregates all ratings and reviews from completed trips, helping riders make informed decisions about which drivers to trust.
- Add estimated times for trips: Use the distance calculation you’ve already built to estimate arrival times based on average speeds, giving riders better expectations before they book.
- Add a messaging function so drivers can contact riders: See more detail in our How To Build guide on WhatsApp.
Building a native mobile app
Ride-sharing is a mobile-first experience, and your riders and drivers will expect a real app they can download. Bubble builds native iOS and Android apps directly from the same visual editor you’ve been using, sharing your database and backend logic across web and mobile from a single project.
With a paid Mobile or Web + Mobile plan, you can publish to the App Store and Google Play Store without leaving the Bubble editor. First-time Google Play setup may still require manually uploading the initial build in the Google Play Console. Over-the-air (OTA) updates let you push bug fixes and content changes without app-store resubmission. Location services, push notifications, and camera access are all available as native workflow actions.
How to launch your Uber clone — and what it costs
When you’re ready to go live, Bubble handles hosting, deployment, and scaling automatically. Connect a custom domain, push updates with one click, and let Bubble take care of the rest.
Custom development for a ride-sharing app can run tens of thousands of dollars. On Bubble, you can build and test on the Free plan before spending anything, then move to a paid plan when you’re ready to launch to real users.
Web plans start at $29 per month when billed annually. If you’re building for mobile too, Web + Mobile plans start at $59 per month. Some templates and plugins may cost more, but you can build all the core functionality of a ride-sharing app without significant additional costs. You’ll also want to account for standard payment processing fees through Stripe, plus any maps API costs.
The Bubble Forum is worth bookmarking. It’s where builders share solutions, post examples, and answer each other’s questions. Whatever you get stuck on, someone’s probably been there.
What you’ve built by following this guide is a real, launchable app — not a prototype. It runs on production infrastructure, handles real payments, and can scale as your user base grows.
Start building your ride-sharing app for free.
Frequently asked questions about building an Uber clone
What is an Uber clone?
An Uber clone is a custom-built ride-sharing app that works like Uber: Riders request trips, drivers accept them, and payments process automatically. Building your own version lets you launch a transportation marketplace without replicating Uber’s infrastructure from scratch.
Is it legal to clone an app like Uber?
Yes — as long as you don’t copy their trademarks, logos, or proprietary code. The concept of a two-sided transportation marketplace isn’t copyrightable. Your branding and implementation just need to be your own.
Is building an Uber clone a good project?
It’s one of the more instructive things you can build, because it touches almost every layer of a real app: dual user roles, database relationships, map and location logic, workflows, and payment integrations. It’s also a legitimate business model if you’ve spotted a local market or niche the big platforms aren’t serving well.
How long does it take to build an Uber clone?
With Bubble AI, you can generate a working foundation in minutes. Getting to something you can actually test with real users — customized workflows, payments integrated, edge cases handled — typically takes a few weeks.
Build for as long as you want on the Free plan. Only upgrade when you're ready to launch.
Join Bubble