So, you have an idea and want to build a mobile app?
You’re in the right place.
Having a great idea is just step one — but we’ve got you covered with the other seven steps, too.
Whether you’re a true beginner or you’ve done some development but never for mobile, we’ll walk you through everything you need to know to create a mobile that works, scales, and can support your business or community.
What is mobile app development?
When you think of traditional software development, you probably think of coding. But today, development — for web apps or for mobile — can be done without code, thanks to no-code and AI development platforms like Bubble.
Types of mobile apps
Not all mobile apps are created with the same process — in fact, there are a few different ways you can make a mobile app:
- Web apps and PWAs (Progressive Web Apps): Web apps and PWAs are interactive apps that run in a browser (like Chrome or Safari). They can be accessed on any device, and it’s one of the easiest and fastest ways to build an app that can be used on mobile. PWAs can be accessed offline, but they can’t be downloaded to your device.
- Wrapped apps are web apps that are “wrapped” in a container to make them more “mobile-like.” It’s still written with web code, but it’s “wrapped” for mobile so that you can download it directly to your app via different app stores.
- Hybrid apps are essentially the same technology as a wrapped app. Hybrid apps generally refer to an app that is designed using web-based programming languages, but is then built within a framework or container designed for mobile. With wrapped and hybrid apps, you get more access to device capabilities, and the app looks and feels more like a true mobile app, but performance is often slower and can be buggy depending on the wrapper.
- Native mobile apps are apps designed for a specific mobile platform (i.e., an iOS app or an Android app). They’re written directly in the code designed for those platforms, can make use of all device features, and generally feel the smoothest and fastest.
Traditionally, native mobile development has been the most time-consuming and resource-intensive way to create apps, because you have to build and maintain completely separate codebases for each app. With web development (including wrapped and hybrid apps), you can build once and then package that code for various platforms.
However, new approaches to the entire development process — like Bubble’s no-code, AI-powered approach — make building native mobile apps easier and faster than ever, reducing your need to rely on expensive teams or long development timelines to give your users the best experiences.
With Bubble for native mobile, you can build visually, using drag-and-drop tools, so you don’t have to code or learn any new programming languages. Even better: Bubble will “translate” it for both iOS and Android using the React Native framework, creating true native apps even though you’re only building once. It’s the fastest, easiest way to create real native apps without code.
Different development approaches
Traditionally, mobile development has always been a tradeoff between speed and ease vs. performance and quality. But newer app development approaches are turning that idea on its head.
In short, here’s your options:
| Development approach | How it works | Pros | Cons |
|---|---|---|---|
| Use a low-code / no-code AI platform (like Bubble) |
Design native mobile apps yourself with drag-and-drop editors that don’t require code or specialized expertise. |
Fastest and least resource-intensive way to build native apps; get the best performance without large upfront investments. |
Requires you to be on the hook for maintenance, some learning curve required to learn the no-code tool. |
| Hire developers or an agency |
You hire an expert to create exactly what you need — typically, mobile developers who are skilled in native mobile development language. |
Can create exactly what you’re imagining, can be less expensive to outsource vs. hiring in-house. |
Can be expensive and time-consuming, and often not practical for small startups. |
| Build in-house |
Use internal resources to develop what you need, potentially using wrappers or hybrid models to fill skill gaps. |
Create mobile apps exactly to your specifications, have a team / resource on board to maintain and grow the app. |
May not have the exact skills on the team you need to build exactly what you’re hoping for, expensive and often not practical to support a mobile team in-house. |
| Wrap an existing website |
Use internal or external resources to wrap your existing website or web app into a mobile format. |
Saves time and resources, gets your mobile app live faster on more platforms. |
Slower, potentially buggy performance for your app, can be difficult to get complex functionality for mobile. |
Many low-code and AI app-building platforms use wrappers to build mobile apps, which can help with speed and expenses, but still run into performance issues.
Bubble is one of the most powerful options for building native mobile apps without code that gives you the best of all the worlds — see how it works:
How much does it cost to build a mobile app?
The cost of building a mobile app varies wildly, depending on:
- Your app’s type and complexity
- Your development method
- Your timeline
- Your own expertise
In general, hiring a developer or an agency is an expensive option. The average annual salary for a US app developer is between $100K–130K. Even if your app only takes a few months to build, you can still easily rack up tens of thousands in development costs.
Here are some general ranges pulled from app development statistics:
| Development method | Complexity | Cost |
|---|---|---|
|
Hiring a development team, dedicated mobile developers, or an agency |
Simple mobile app |
$10,000–$50,000 |
|
Moderately complex mobile app |
$50,000–$120,000 |
|
|
Complex mobile app |
$150,000+ |
|
|
DIY / no-code |
Any complexity |
$5,000–$15,000 |
Obviously, building something yourself can be much cheaper — but you also need to consider the “cost” of your own time, and your own expertise. If you’re not an experienced builder, something that may take a few days for an experienced developer might take you weeks or months. Cost and time are often a tradeoff.
If you don’t have a lot of software development expertise or experience, Bubble provides native mobile app building tools that help you eliminate both expensive costs and unmanageable timelines and learning curves. Yes, you still have to learn the Bubble platform — but it’s designed to be accessible for non-developers, meaning anyone can learn and build on Bubble in weeks, not the years that learning to code would take.
In short:
- Hiring developers can be faster than building yourself (due to their expertise), but developing custom code is still time-consuming. Plus, this is the most expensive option.
- DIY-ing your app can be less expensive, but requires you to have the experience needed to build it in a timely manner. The tradeoff is usually time vs. money.
- A no-code / AI-powered platform like Bubble gives non-developers the skill support to build their own mobile apps quickly and affordably. Plus: You can build on Bubble for free until you’re ready for launch, so your startup costs are literally $0.
How long does it take to build a mobile app?
As with costs, timelines for the app development process vary a lot too. The more complex your app is, the longer it’ll take to build.
If you’re hiring a development team, a bigger budget will help you move faster (since you can hire more people to work on the app and get it done). In general, development team timelines can range:
- For simple apps: 2–4 months
- For moderately complex apps: 3–6 months
- For complex apps: 6–9+ months
If you’re DIY-ing your app, your timeline depends largely on your own availability and expertise. But with Bubble, that timeline might be shorter than you think, even if you’re not a programmer.
David Bressler — a marketing analyst with no programming background — built the MVP of his app, Formula Bot, in a single weekend on Bubble. It quickly gained traction, and in less than a year, David had scaled Formula Bot to a complex data analyst tool with over 1 million users, while only working on it “on the side” of his full-time job.
His story isn’t an isolated one. Founders and small teams are consistently building apps in just weeks on Bubble that would have taken months using other development methods:
- CreateWith conference co-founder built a mobile app for their event in just weeks on Bubble — launching the app for this year’s conference without high development costs.
- ChurchSpace launched their MVP three times faster on Bubble than they could have with custom code, saving an estimated 5 times in development costs.
- Artizen, a crowd-funding platform for artists, switched to Bubble from a traditional development team and launched 10 times faster — while also saving $125,000 a month.
How to create a mobile app in eight steps
Traditional development processes follow a very specific series of steps, but today’s vibe coding and AI development — not to mention no-code, low-code, and other DIY options — are shaking up those processes.
No matter how you’re building your app, these are the basic steps you’ll go through, from initial idea to launch and beyond.
P.S. Rather learn by watching? Watch a deep dive on building a mobile app from start to finish:
Step 1: Define your app idea
Developing a good mobile app idea goes beyond a basic premise or category (i.e., “Duolingo but for _____”). There are literally millions of apps on the app stores. Creating one that stands out requires:
- A clear problem and solution: What (real, felt) problem does your app solve?
- A defined audience: Who’s your app going to help?
- A strong product-founder fit: Are you the right person to create this app, and if so, why?
- Differentiation from competitors: How does your app solve problems differently (and better!) than other options on the market? Why will your defined audience choose your solution over another?
With your idea solidified, you can define the minimum viable product (MVP) that will solve the problem. That is, what are the most basic features and functionality needed to deliver on your app’s promise?
Step 2: Perform market research
At this point, you need to validate and further solidify your ideas. The best way to do that? Market and audience research.
Your market research should include:
- Competitor analysis: What other solutions exist for the problem you’re targeting? Those can be traditional solutions, other businesses or services, or other mobile apps.
- Market gaps: Where do those other solutions fall short? These gaps in other solutions provide key elements of potential differentiation for you.
- User feedback: What pain points, unmet needs, or feature requests do users want? Look at competitor’s reviews, online forums, and social media for feedback from your target users. Or better yet — set up a survey or some focus groups to ask them yourself!
- Audience demand: How much do users want a different solution? How much do they want the solution you have in mind? It’s easy to think of a new solution to an old problem — but finding the solution that your audience wants is harder (yet, more valuable).
This market and audience research allows you to get into the heads of your ideal customer to develop a key differentiator and find product-market fit. Once you see what others are doing, what others are missing, and what your audience really wants, you can set your app apart and get busy creating the features your audience wants the most.
Step 3: Determine your app’s features
Your market and user research can then help you define:
- How your app is structured
- The core “user journeys,” or ways that someone will move through your app
- Essential features that must be included in v1
The best way to think through structure and features is through the eyes of your user. What are the users’ core problems? What core tasks or goals will they be using your app for? For example, core tasks on a travel app might be searching for a hotel, booking a hotel, viewing your reservation, and looking at hotel or check-in details.
Then, you can map out the user journey for each of those tasks to understand what screens and features you’ll need for each of those steps. For example, searching for a hotel might require:
- A search engine
- Search engine filters
- A loading page
- Results page with hotel properties details
Don’t get too ambitious at the beginning with exciting features — start with the essentials, and launch an MVP or v1 of your app early to gain traction and get real customer feedback, then iterate based on user needs and wants.
Step 4: Design your app’s interface
With your essential workflows and features in mind, you can now start to wireframe or design your app’s interface. As you do so, keep in mind core mobile design principles:
- Keep it simple: Each screen should serve one core purpose, and use white space to keep screens uncluttered.
- Be consistent: A consistent style and design system makes your app visually appealing and more intuitive to use.
- Design with mobile gestures in mind: Keep in mind how your app will be used — minimal typing, easy-to-reach buttons, and navigation that makes sense for mobile gestures like swiping and tapping.
- Optimize for performance: Avoid resource-heavy graphics and animations in your design that can slow down performance on mobile.
- Follow native design conventions: Use platform-specific UI standards for iOS and Android to keep your app intuitive and easy to use.
Traditionally, wireframing has been the first step in the app design process, but tools like Bubble let you skip the wireframing and go straight to designing in the same editor you’ll use to build your app. Bubble uses a visual editor that lets you design everything with intuitive, drag-and-drop tools.
But don’t think that drag-and-drop means you’ll lose customizability — Bubble’s editor gives you full control, down to the pixel, so you can design your app exactly as you’ve imagined it. Plus, you don’t have to convert your design later into code for the final build. You’ll add functionality in the same editor, with the same drag-and-drop functionality. Fewer steps, faster process — and no repeating the work you already did.
Step 5: Build your app
With your design and UI in place, you can build out the functionality of your app: the features, the workflows, and the data that makes it work.
Here’s your checklist for building:
✅ Start with data structure: What types of information (data) does your app need to store? Building your database allows you to set up and organize data types, which will help power the workflows and actions of your app. For example, if your app allows users to log in, your app might need to store data like email addresses, user names, or phone numbers.
✅ Build workflows: Logic powers the features of your app. Workflows connect your app’s UI to the data. For example, when you click the “search” button, your app filters through the data and takes users to a results page. Or when they click on the “home” button, it takes them to the home page. You can set up this kind of logic and functionality without coding on Bubble using workflows, with an if-then structure.
✅ Set up integrations: What other tools, apps, or software will your app connect to? For example, are you going to use Stripe to accept payments? Or maybe you’re creating an AI-powered feature in your app with OpenAI or Claude. You can connect other tools and services using plugins — on Bubble, it just takes a few clicks to add integrations and expand functionality quickly.
And in the future, you’ll be able to do all of this — even for mobile — with Bubble’s AI. Catch a glimpse of what’s coming soon:
Step 6: Test and refine your app
You’ve now done the three biggest pieces of creating an app:
- You’ve created a design (the user interface)
- You’ve set up databases and some data
- And you’ve built some logic, or workflows, to tie the design and data together to make your app work.
You’re almost ready to launch! But first, you’ll want to test your app thoroughly to get rid of bugs, ensure functionality works as expected, and make sure it meets your users’ expectations.
Bubble’s mobile preview and BubbleGo app let you test your app as you build, which is a great way to check for obvious bugs and make sure it looks great on every screen size. (BubbleGo lets you test out your app on mobile, even before it’s launched!) But you still don’t want to skip the traditional testing stages:
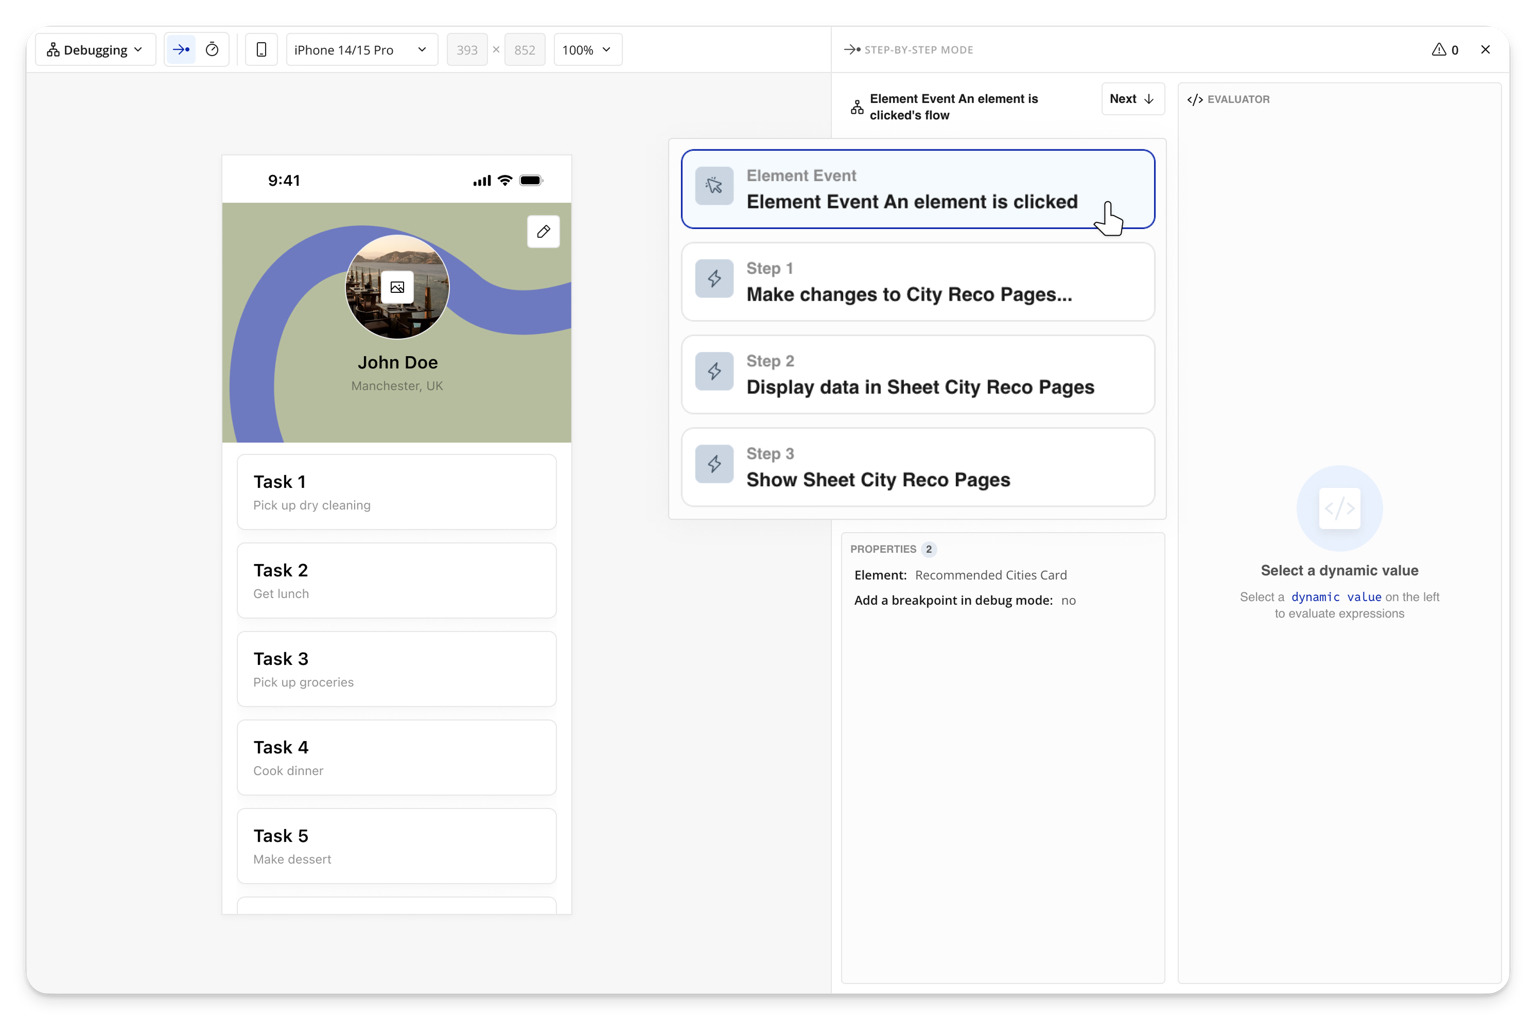
- Initial testing and debugging: First, you’ll test the app yourself. Carefully check each screen and all the workflows of your apps for errors. Use the preview mode to test it like a real user, walking through different scenarios and user journeys to make sure they all work. Bubble’s built-in Debugger and Issue Checker can help you automatically find errors and bugs with workflows and elements — and figure out how to fix them.
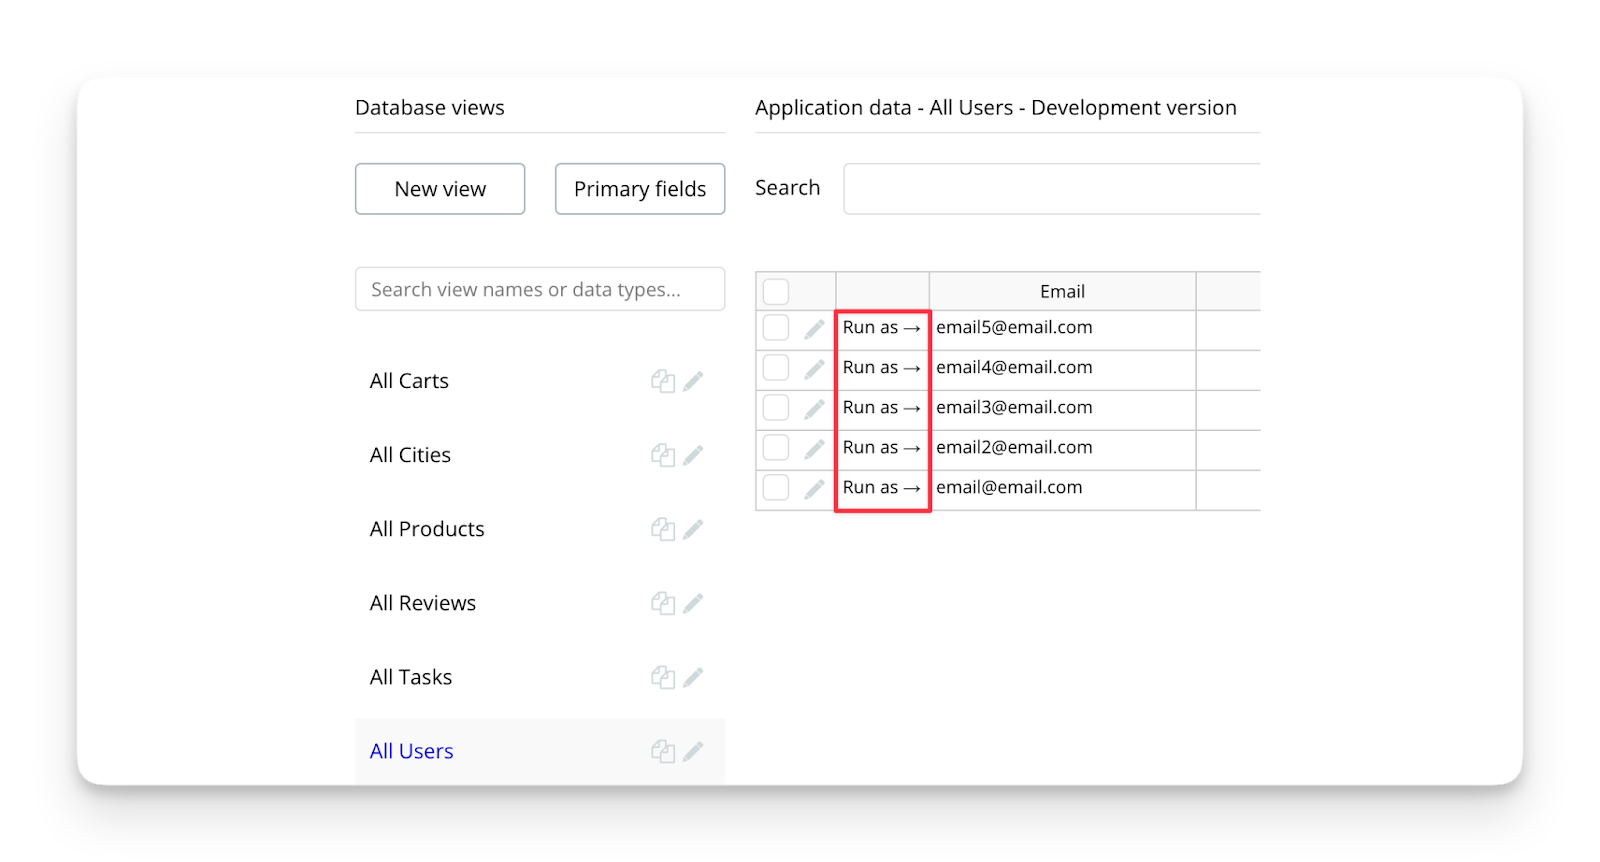
- Internal testing (aka alpha testing): If you’re working with a team or within a larger organization, recruit team members to test out your app as well. It can also be helpful to test different user types within your app. On Bubble, search for a specific user in the database editor and click “Run as” to test it as that user. This can help you make sure that access permissions, security, and customized views work as expected.
- Beta testing: In beta testing, you’ll invite a small group of external users — usually people in your target audience or power users — to test out the app or new features and report any issues or unclear areas. This is a great time to run usability testing, but you can get broader customer feedback from beta testers, too.
- Soft release: A soft release is optional. If you do one, you’ll release your app to a larger — but still limited — group of users before launching publicly. A soft release can help you build demand for your app, test out and ensure scalability, continue to find and fix bugs, and improve features before launching to a big audience.
In each wave of testing, here are five key areas to think about:
| Development area | Questions to keep in mind |
|---|---|
| Functionality |
Does everything work as expected? For example, do buttons trigger the right actions? Do forms save to the database? Are users directed to the right screens at the right times? |
| Usability |
Is your app easy to use? Can users easily navigate it without instruction? Do they know how to complete each core task easily? |
| App performance |
Does your app load quickly? Are animations smooth? Strong performance on every platform reduces churn after you start gaining users. |
| Cross-device compatibility |
Does your app work just as well on all platforms (iOS, Android, and the web)? Some frameworks may require you to use custom UI components for different platforms to get consistent results. With Bubble, your apps are native on both iOS and Android — and you can test them on either platform using BubbleGo. |
| Edge cases |
Don’t just test the desired user journeys — make sure that everything works well even when users don’t do what you expect (which will be often!). Do error states and pages load appropriately? Are users redirected to the most obvious result? Do they know how to fix the problem when they run into an error state? |
Step 7: Launch your app
Congrats! At this stage, you’re ready to launch your app. Launching your mobile app requires submitting it to the Apple App Store and/or the Google Play Store. Both have their own app store guidelines that are independent from Bubble — but when you build on Bubble, we’ll make the process of publishing and deploying your app as easy as possible.
On the App Store: Apple’s review and deployment process is fairly rigorous, and requires several steps, including:
- Signing up for a Developer account and verifying your identity
- Paying an app registration fee (to Apple)
- Configuring and packaging your app for deployment (Bubble does this for you automatically!)
- Submitting your app for review
- Publishing and making it available to users
On the Google Play Store: The process is more automated and usually faster than on the Apple App Store, but it still requires similar steps, including setting up an app and project in the Google Play and Google Cloud Console, configuring app settings for Android, deploying your app for testing and review, and then launching your app.
Don’t worry, though! Bubble helps you through the entire process, and automatically packages your app for publishing and deployment on both app stores, as well as launching to the web. Instead of navigating all the steps to deployment manually, you get one-click deployment and then just wait for the app stores’ approval — one more way that Bubble makes everything just a bit (ok, a lot) faster.
Step 8: Iterate and grow your app
You’ve come a long way, but publishing your app is truly just the beginning. After your app goes live, there’s still a lot you’ll need to do to maintain, improve, and scale your app.
Here’s your checklist for maintaining and growing your app:
✅ Gather feedback continuously. Ongoing user testing and feedback is a crucial part of improving and growing your app. Your users are the best people to tell you how you can improve — and what features to build next! In-app surveys, support emails, app store reviews, and built-in analytics can all help you understand how users are using your app and what they want to see next.
Not sure where to get started? Use a plugin like Mixpanel or Hotjar to integrate analytics, tracking, heatmaps, and other user data right into your Bubble editor.
✅ Stay up-to-date on security and privacy. Each platform has their own security requirements — not to mention regional or global security requirements, or regular compliance standards that apply to your app. It’s a lot to keep up with, but Bubble makes it a lot easier by building in security and privacy to your editor. You can add and edit privacy rules visually (no need to code them!) and our partnership with Flusk gives you automated security checks, enhanced enterprise privacy, and more.
✅ Make regular updates. Fix bugs as they appear, improve UI and design based on usage, incorporate new features and functionality, and respond to user feedback. Not every update has to be user-facing, either — updates to your infrastructure, databases, logic, or other backend features can provide critical performance support and upgrades.
For smaller, regular updates, use over-the-air (OTA) updates to push changes and bug fixes live, without needing to re-submit to the app stores or making users download a new version. Not all mobile app frameworks support OTA updates, but Bubble does! Plus, Bubble offers built-in version control to make it easy to track changes, work on multiple major updates at once, and roll back to previous versions if needed.
✅ Scale your backend as needed. As your audience (and database) grows, you may need to scale your backend to keep up with your app’s demand. This is a good problem to have! But it still requires a lot of maintenance — such as adjusting your database architecture, setting up backend monitoring, and distributing traffic effectively. On Bubble, hosting is managed by Bubble — so your app is secure and infinitely scalable, without much work on your end.
✅ Maintain changelogs and update announcements. Finally, make sure you keep your users up-to-date on … well, what’s up-to-date. Check out Bubble’s product updates if you need some inspiration.
Build your mobile app on Bubble
Getting a great mobile app idea? Easy. Making it real? A lot more complicated.
At Bubble, we’re bringing mobile app development to everyone — regardless of your background or experience. With a visual editor and drag-and-drop development for design and functionality, Bubble makes it easy to build a mobile app that can scale.
Plus, Bubble offers a best-of-both-worlds approach compared to other app builders available. Unlike traditional development, building on Bubble is fast, intuitive, and accessible. But unlike most AI-powered app builders, Bubble offers you full control, customization, and scalability — without having to code or getting stuck in AI prompt loops.
The result?
- You get to build visually with a full-stack, truly no-code editor, while still maintaining full control.
- You can build anything you imagine — from simple personal apps to complex enterprise apps.
- You can build for web and mobile all in one place — build once, launch everywhere.
- You get best-in-class, enterprise-grade security. Don’t worry about leaking or exposing sensitive user data — Bubble offers SOC 2 Type II and GDPR compliance, automated security and vulnerability testing, and more.
- You can launch and update quickly with OTA updates and automatically packaged apps ready for submission when you are.
- You get to build with confidence, knowing you have a scalable backend, built-in hosting and security, and a trusted platform that supports everyone from hobbyists to major enterprises.
Build for as long as you want on the Free plan. Only upgrade when you're ready to launch.
Join Bubble